Nightscape photography is a type of astrophotography that includes the landscape or foreground interest as the main subject and uses the night sky in a supporting role to convey the idea or story of the image.
For this discussion, all focal length references are based on a full-frame camera. If shooting with an ASP-C or Micro 4/3 camera, you will have to use the appropriate multiplier for your specific camera.
In this article, we will cover the required gear, camera settings, and tips on what to look for when planning your next adventure to capture the beauty of the night sky.
Camera Gear
📸
Tripod: A sturdy tripod is a must due to the long exposures needed to capture the night sky. Camera: Any modern camera with interchangeable lenses that will allow you to manually set shutter speed, aperture, and ISO will work.
Lens Choice: Aperture controls how much light passes through the lens to the camera’s sensor. Because we are trying to capture the light of distant stars, we want to choose the fastest lens available. Most lenses with a maximum aperture of f4 or larger will work for this type of photography; however, ideally the larger the aperture the better. The focal length of the lens affects the apparent movement of the stars within your scene. The longer the focal length the more movement is captured; therefore, longer focal lengths require faster shutter speeds to freeze the movement of stars or can be used creatively to exaggerate star trailing.
So, if I have a kit lens 18-55mm f3.5-5.6 can I shoot nightscape images? Yes, there is no reason you should assume you cannot capture images using a “kit” lens. You will have to experiment with your specific camera and lens combination to know for sure, but modern cameras and lenses are more capable than many photographers give them credit.
Remote shutter release or exposure delay: Both will reduce the camera shake from pressing the shutter button. Many shutter releases also so have an intervalometer function that can be programmed to take multiple images after a set interval. This function is useful for capturing star trails and for capturing multiple frames for stacking in post-processing. The exposure delay function is used to delay the actuation of the shutter for a predetermined amount of time after the shutter button is pressed, usually 1 to 3 seconds. Allowing any vibration introduced by the act of pressing the shutter button to settle out.
Flashlight: This should go without saying. We are stumbling around in the dark here… I find it best to have a headlamp with a red light to prevent temporary loss of low-light vision. Just be considerate when shooting with other photographers at night as red light is difficult to remove in post-processing.
Camera Settings
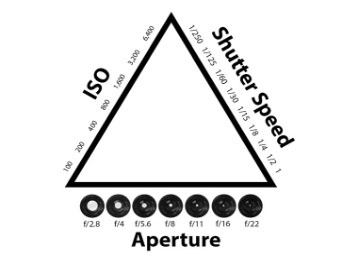
Aperture
For astrophotography, the biggest consideration when selecting an aperture is allowing the maximum amount of light possible. Depth of field is not typically a worry since the stars/night sky are far enough away to be in focus even when you set your aperture wide open. The distance between your foreground and the front element of your lens; however, may require refocusing on your foreground or focus stacking to get it all in focus.
Shutter speed
Due to the rotation of the earth, the night sky is in continuous motion. Makes it challenging to know what shutter speed is best to capture the stars. Using too short of a shutter speed can lead to underexposing your image or the need to use an excessively high ISO resulting in issues with image quality.
During the film era photographers used the “500 rule”, which is a guideline to aid in selecting the shutter speed to capture pinpoint stars. The shutter speed, measured in seconds was determined by dividing 500 by the focal length. For example, if using a 24mm lens then 500/24= 20.833. In this instance, you would round down to the nearest whole number giving you a shutter speed of 20sec.
Modern digital camera sensors have more pixels than grain in film. This allows digital cameras to capture finer details than the film was capable of. This makes using the 500 Rule with modern cameras problematic as it produces some star trailing. To compensate for this some thought and experimentation are called for.
Answering a couple of questions about the final image will help guide your choices. First, how will the image be displayed? Second, how large? If you’re only sharing the image on social media or printing small sizes, then the 500 rule may be acceptable. The larger the image is printed or displayed the more apparent any star trails will become.
This is where experimentation will come into play. Depending on your camera’s pixel count, sensor size, and your intentions for the image, it would be best to experiment with different shutter speeds until you find the combination that works best for your specific camera.
One approach is to modify the 500 Rule by reducing it to 400 or 300 to get starting points for your experiments. Just remember to adjust your ISO accordingly to account for the shorter shutter speeds.
Alternatively, applications like PhotoPills are available to take some of the guesswork out of figuring out shutter speed. The app uses your camera’s make and model along with the focal length to calculate the shutter speed. The calculator has two modes to customize the results. The default setting produces slightly longer speeds by allowing for barely noticeable star trailing. The “accurate stars” produce the shortest shutter speed to capture true spot stars.
ISO
As with other genres of photography, we are concerned with capturing our images with as little noise as possible. Astrophotography is no different; however, we have different ways of dealing with the noise created by using high ISOs required to capture starlight. I still try to use the lowest possible setting to get good exposure to the stars. The settings used most are between 3200-12800 for a f2.8 lens depending on the shutter speed/focal length combination.
White Balance
I set a manual white balance when taking night sky images. My reasoning is to ensure I capture the different colors of the stars and to do so I set a manual white balance between 3800 – 4500K. I have found that this range produces good colors in the stars and acceptable color contrast between the Milky Way core and the night sky color.
Is setting manual white balance necessary when shooting in RAW? I think it is. Yes, you have a lot of latitude to adjust the white balance on RAW images in post-processing. Unfortunately, there are limits to these adjustments and if your white balance is too far off when you adjust it in post processing you end up with muddy colors and little color contrast in the
Focusing in the Dark
Focusing a DSLR in the dark can be tricky when your camera’s auto-focus system requires more available light to function properly. Looking through the viewfinder you can’t see anything either. How are you to focus when neither you nor your camera can see the scene well enough?
What about using the infinity mark on my lens?? From experience, I can tell you turning the focus ring to the infinity mark on your lens will only lead to blurry stars and frustration…The most reliable way I have found to focus my camera in the dark is to use the live view on the back of the camera, manual focus, and gaffer’s tape.
First, you will need to make some settings changes. To protect the light sensitivity of your eyes you want to turn the brightness of the back screen down to its lowest setting. For Nikon, this setting is -5. Reducing the brightness will also help when reviewing images in the dark. Next, turn off vibration reduction and switch either the camera or the lens to manual focus. This will prevent the camera’s auto-focus system from trying to re-focus when you start taking images.
Now, locate a bright star or a distant light source. Using live view on the back of your camera, zoom in to 100%. then adjust the focus ring until the light is just a tiny pinpoint. Once it is set, I like to place a piece of Gaffers tape across the focus ring in the lens to prevent it from moving if I bump it.
If focusing on foreground elements is required, turn the camera’s autofocus on and use a light source (flashlight) to illuminate the subject enough for the camera to lock focus. I will zoom in to 100% to confirm the focus is sharp then turn autofocus off. Often foreground elements are far enough away from the lens that once the camera is focused on the stars, everything else in the image is acceptably sharp.
Planning a Night-scape Shoot
Planning a night photoshoot can be intimidating. There are many factors to consider, and it can feel like you are literally trying to align the stars. However, like other endeavors, it gets easier the more times you do it. In this section, we will discuss some things to consider when planning your shoot along with helpful apps that I use in my planning sessions to make the best decisions possible. Environmental conditions can greatly affect our view of the night sky. Light pollution, moon phase, and position, clouds & weather can interfere with your view of the night sky.
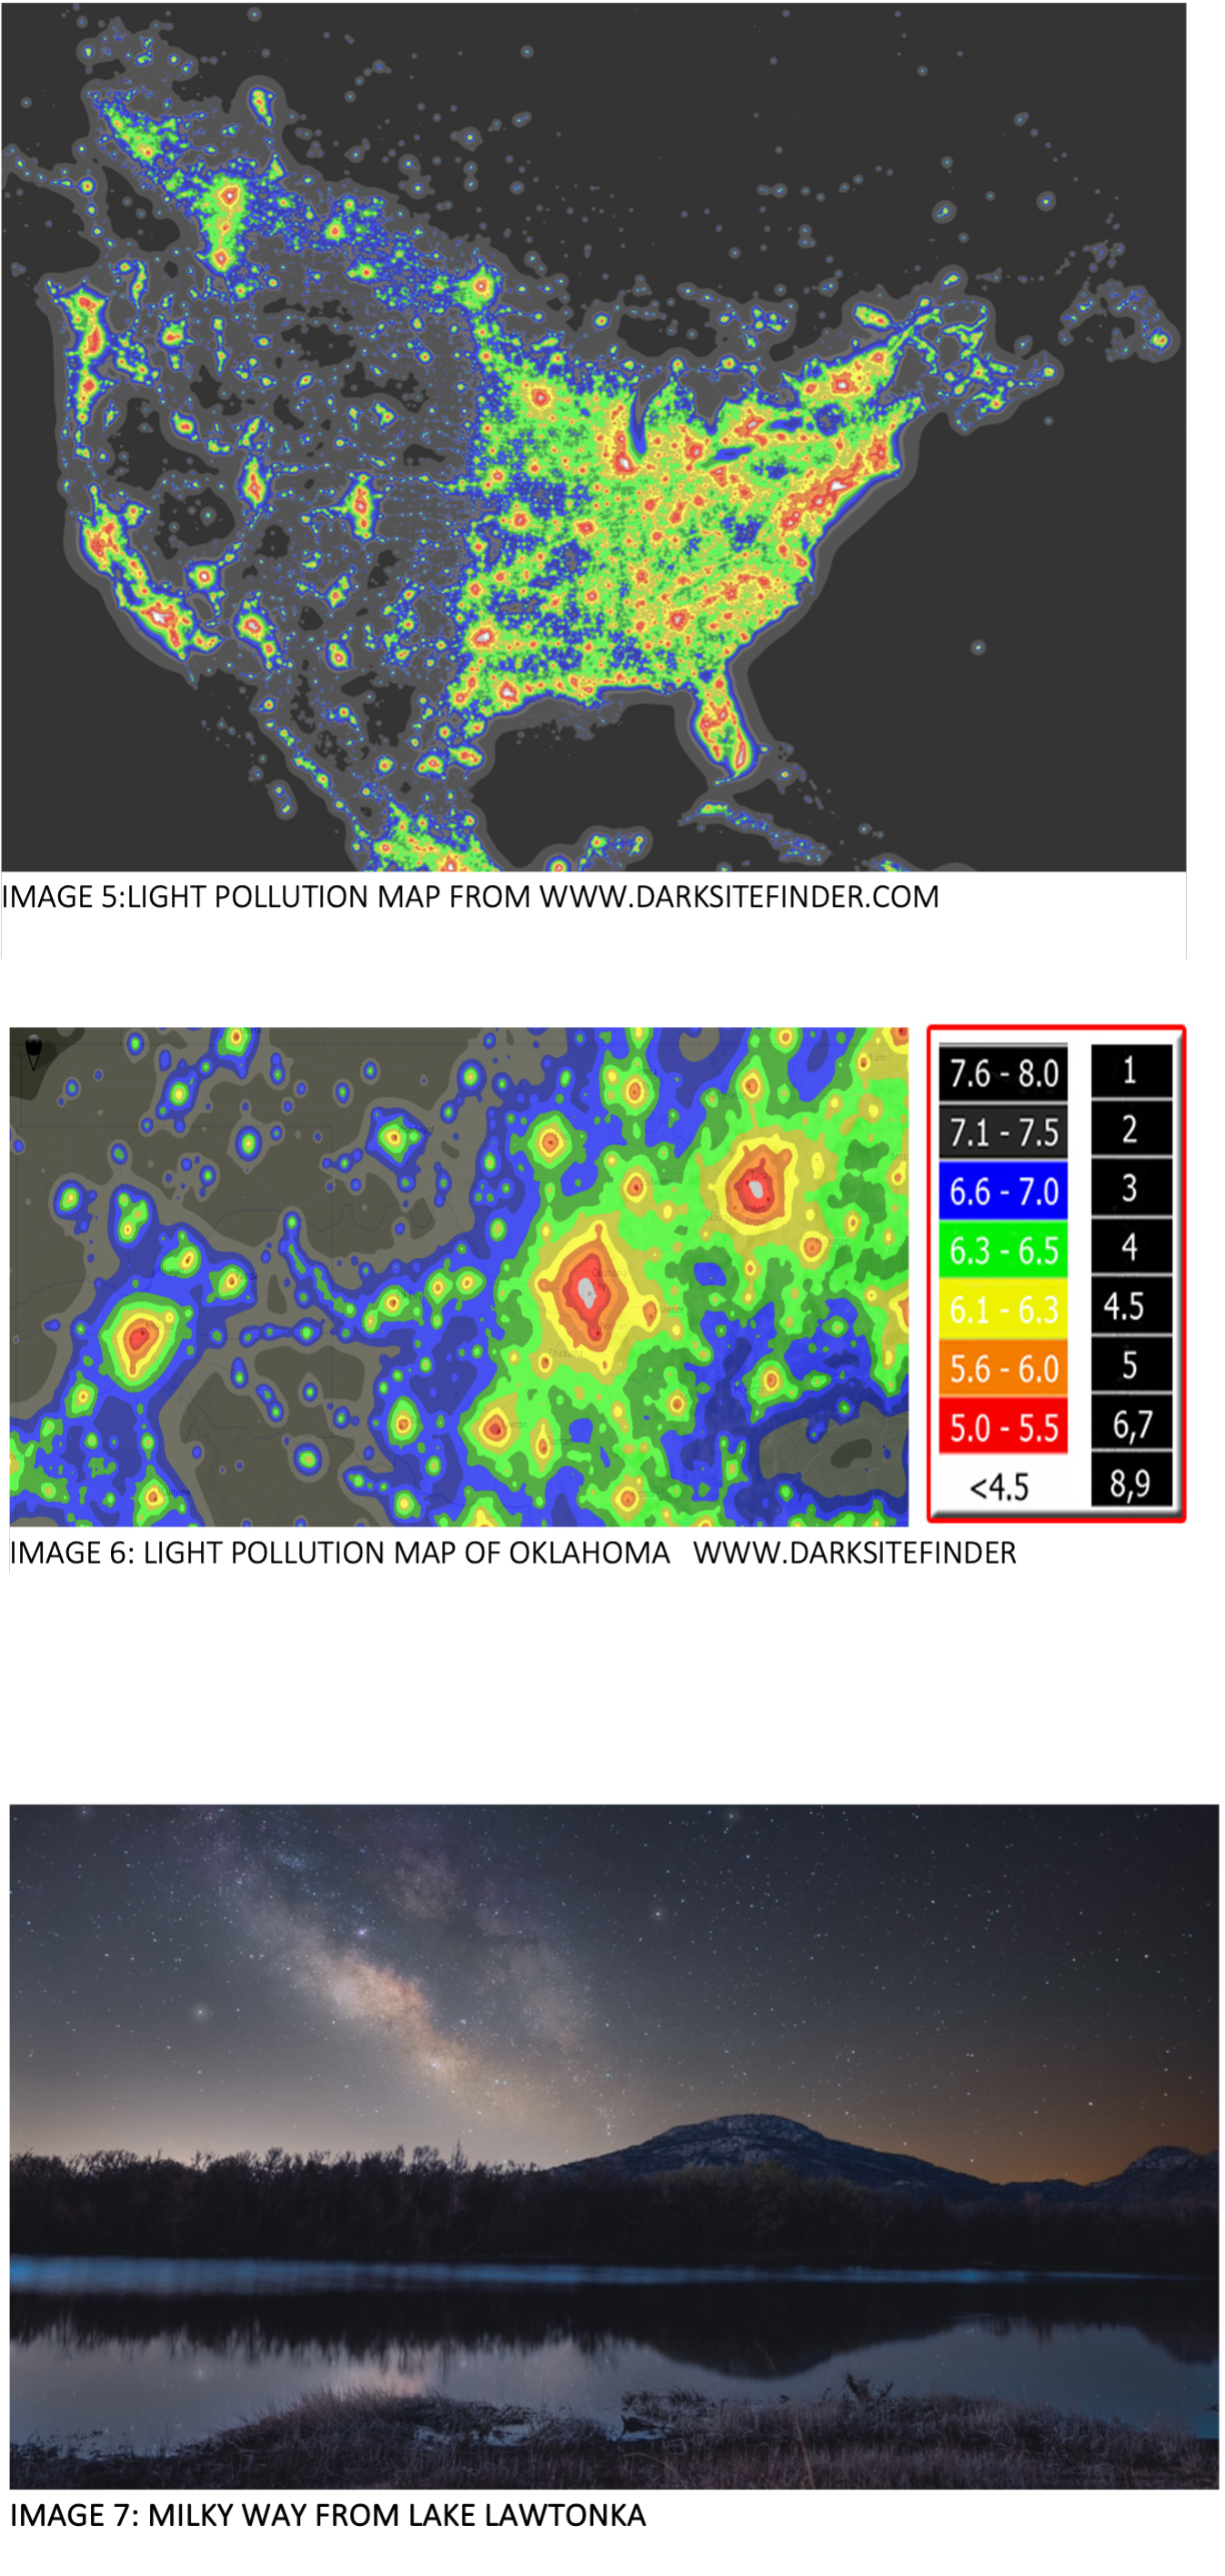
Light PollutionLight pollution is measured using the Bortle scale, which ranges from 1 to 9 and measures the observability of celestial objects in the night sky with 1 being the darkest and 9 being the brightest. The map shown above is a light pollution map that provides a visual representation of light pollution levels across the country. Below is another light pollution map of Oklahoma. The map is intuitive enough to read: the lighter color represents more light pollution, and the darker color represents less.
Using these maps during your planning provides information about the lighting levels and how they may affect your nightscape shoot. Light pollution (depending on the level) can obscure the visibility of the night sky. They do make light pollution filters to remove certain light associated with traditional light pollution; however, the increased use of LEDs in exterior lighting is starting to reduce the efficacy of these filters.
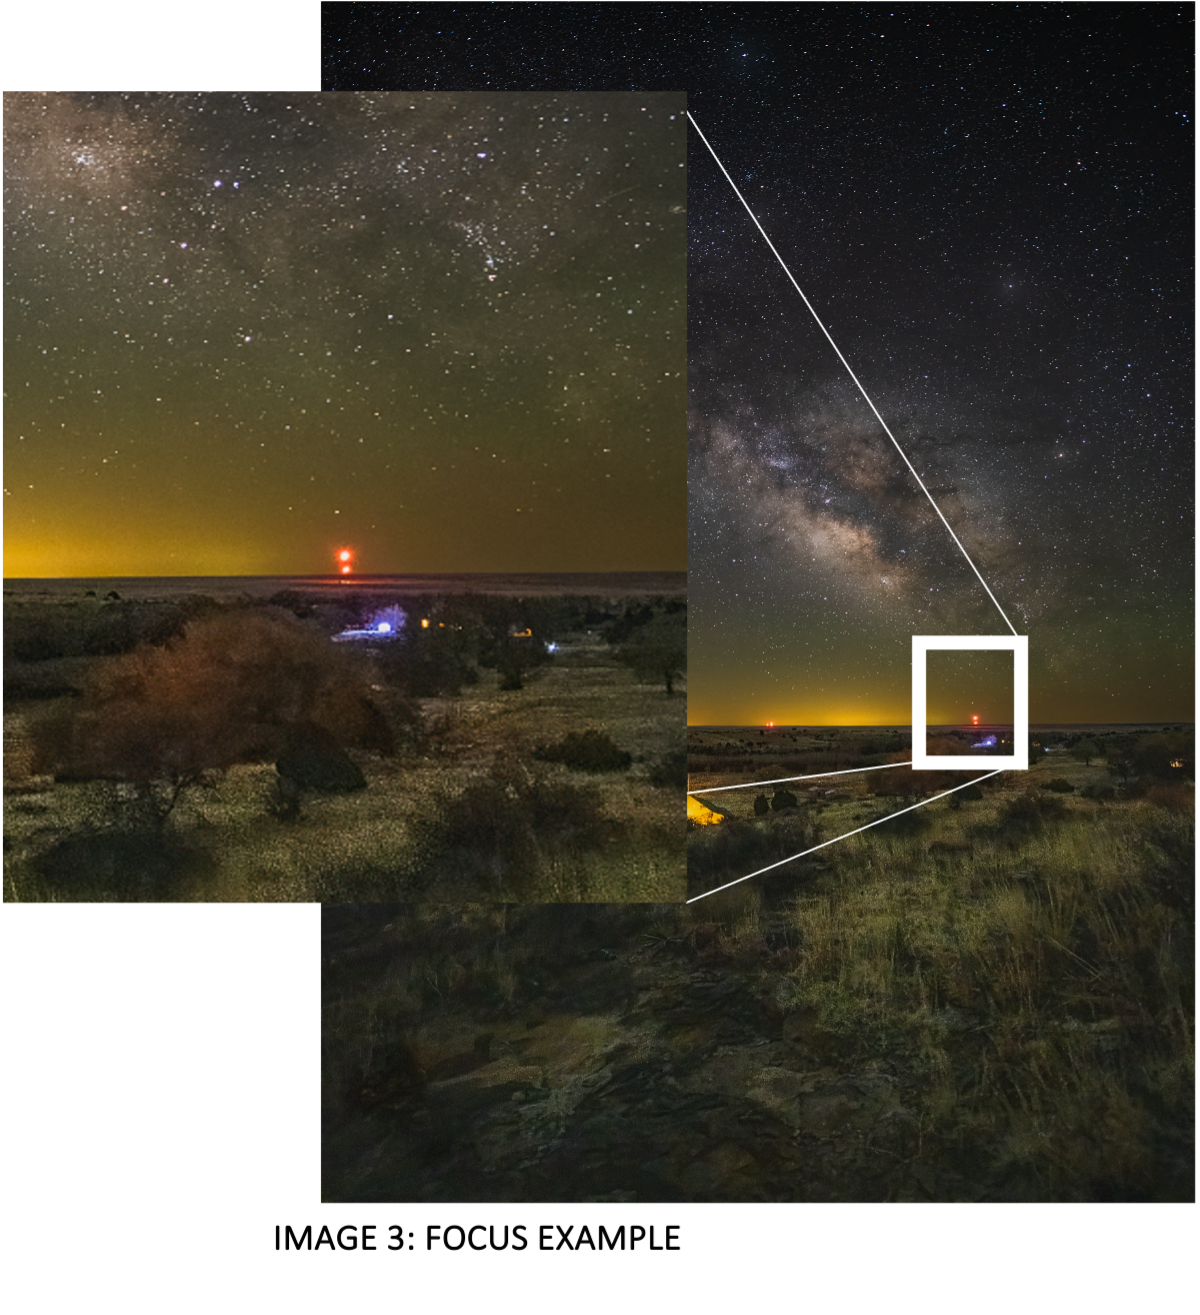
You will need to consider the direction in which you plan to point your camera. The light dome above a city can affect the view of the night sky for many miles. You could find an acceptable site to shoot outside a major city; however, you may still be affected by the light pollution due to having to shoot through the light dome. For example, in the image to the right, the light pollution from a nearby city can wash out the colors from the Milky Way core even though the location I am shooting from is dark.
This image does make the point that you can take pictures of the night sky in areas with light pollution; however, it will be much more difficult during the editing phase to separate the Milky Way from the light pollution.
Moon Phase and Position
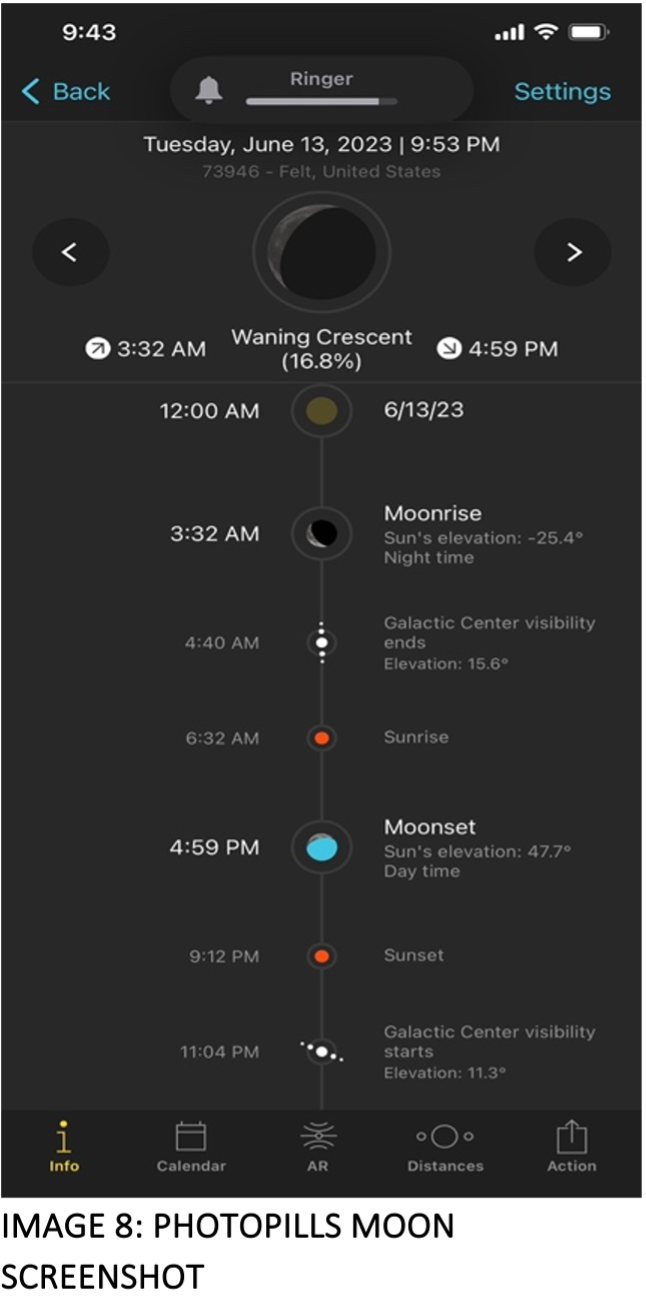
Similar to the effects of light pollution a full moon is bright enough to wash out many of the stars and the Milky Way core in the night sky. Using a moon phase calendar to track the phase along with the rise and set times is great information to have when planning a shoot. For this part of the planning, I use an app called PhotoPills. It provides date-based information for the different moon phases and traces the position, rise, and set times for the moon as well as the Milky Way core. This allows me to coordinate the timing of my photoshoot giving me the best opportunity to capture the stars. The PhotoPills app has become an essential tool for my planning!
Weather and atmospheric Conditions
Clouds, wind, and humidity can impact your photoshoot. While a few clouds can be a wanted addition to the night sky images too many can ruin your night. The same goes for wind and humidity; too much of either can create issues with capturing good night sky images.
Wind can introduce vibration into your camera and tripod resulting in blurry images. Additionally, strong winds in an arid environment can kick dust up into the atmosphere causing visibility issues. Humidity can cause the night sky to be hazy and difficult to produce clear images. Predicting the weather is challenging for professionals and I do not claim to be a weather expert. I use a couple of different weather apps to get my information. The first is an app called Windy. There is a website (windy.com) and a mobile app that I use. They have all sorts of weather and atmospheric prediction models, but I tend to use the cloud and wind speed the most.
The second app I use is Clear Outside. It has a simple spreadsheet-style readout providing percentages for cloud cover, visibility in miles, fog, and wind windspeed. By using multiple apps, I can form a rough idea of what to expect. The weather is always a wildcard and any decisions surrounding it are left to right before heading out into the dark.
Milky Way Season
The Milky Way is visible year-round; however, here in the Northern Hemisphere, the galactic core is only visible above the horizon from February through October with peak times being from April to September.
During this time, as the Earth continues to travel along its orbit around the sun, the perspective of the Milky Way changes. During the early part of the season the Milky Way is leaning more to the left and can form an arch over the landscape when photographed as a panorama or with an ultra-wide-angle lens facing the east. As the season progresses, the Milky Way begins to become more vertical as it traverses the night sky.
The other aspect that changes as time moves from early spring into fall is the time and duration the Milky Way core is visible above the horizon. Starting in mid-January the core rises above the horizon for only a few minutes just before sunrise. Gradually, as the days pass, it rises earlier and earlier. By April the core is rising in the early morning and is visible until an hour and a half before sunrise (approximately the start of the blue hour). This progression continues until mid-November when the core sets below the horizon just after sunset.
PhotoPills is an invaluable tool for predicting the time and duration the Milky Way core will be visible but also it provides an approximate orientation as well. Notice in the above “Image 7”, there is an icon representing the Galactic Center. Its orientation is presented as a representation of the Milky Way in the sky at those times.
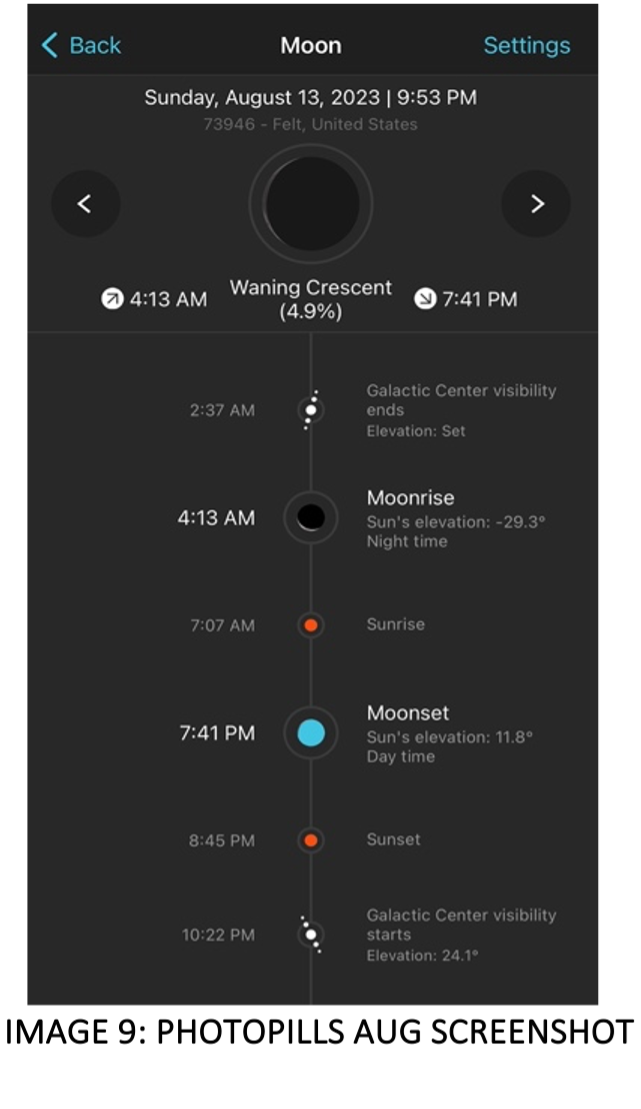
Star Trails
What better way to depict the passage of time than capturing star trails! The trouble is visualizing how the stars move across the night sky. I am sure you have seen images online with star trails in concentric circles, arches, and streaking across the sky like rain.
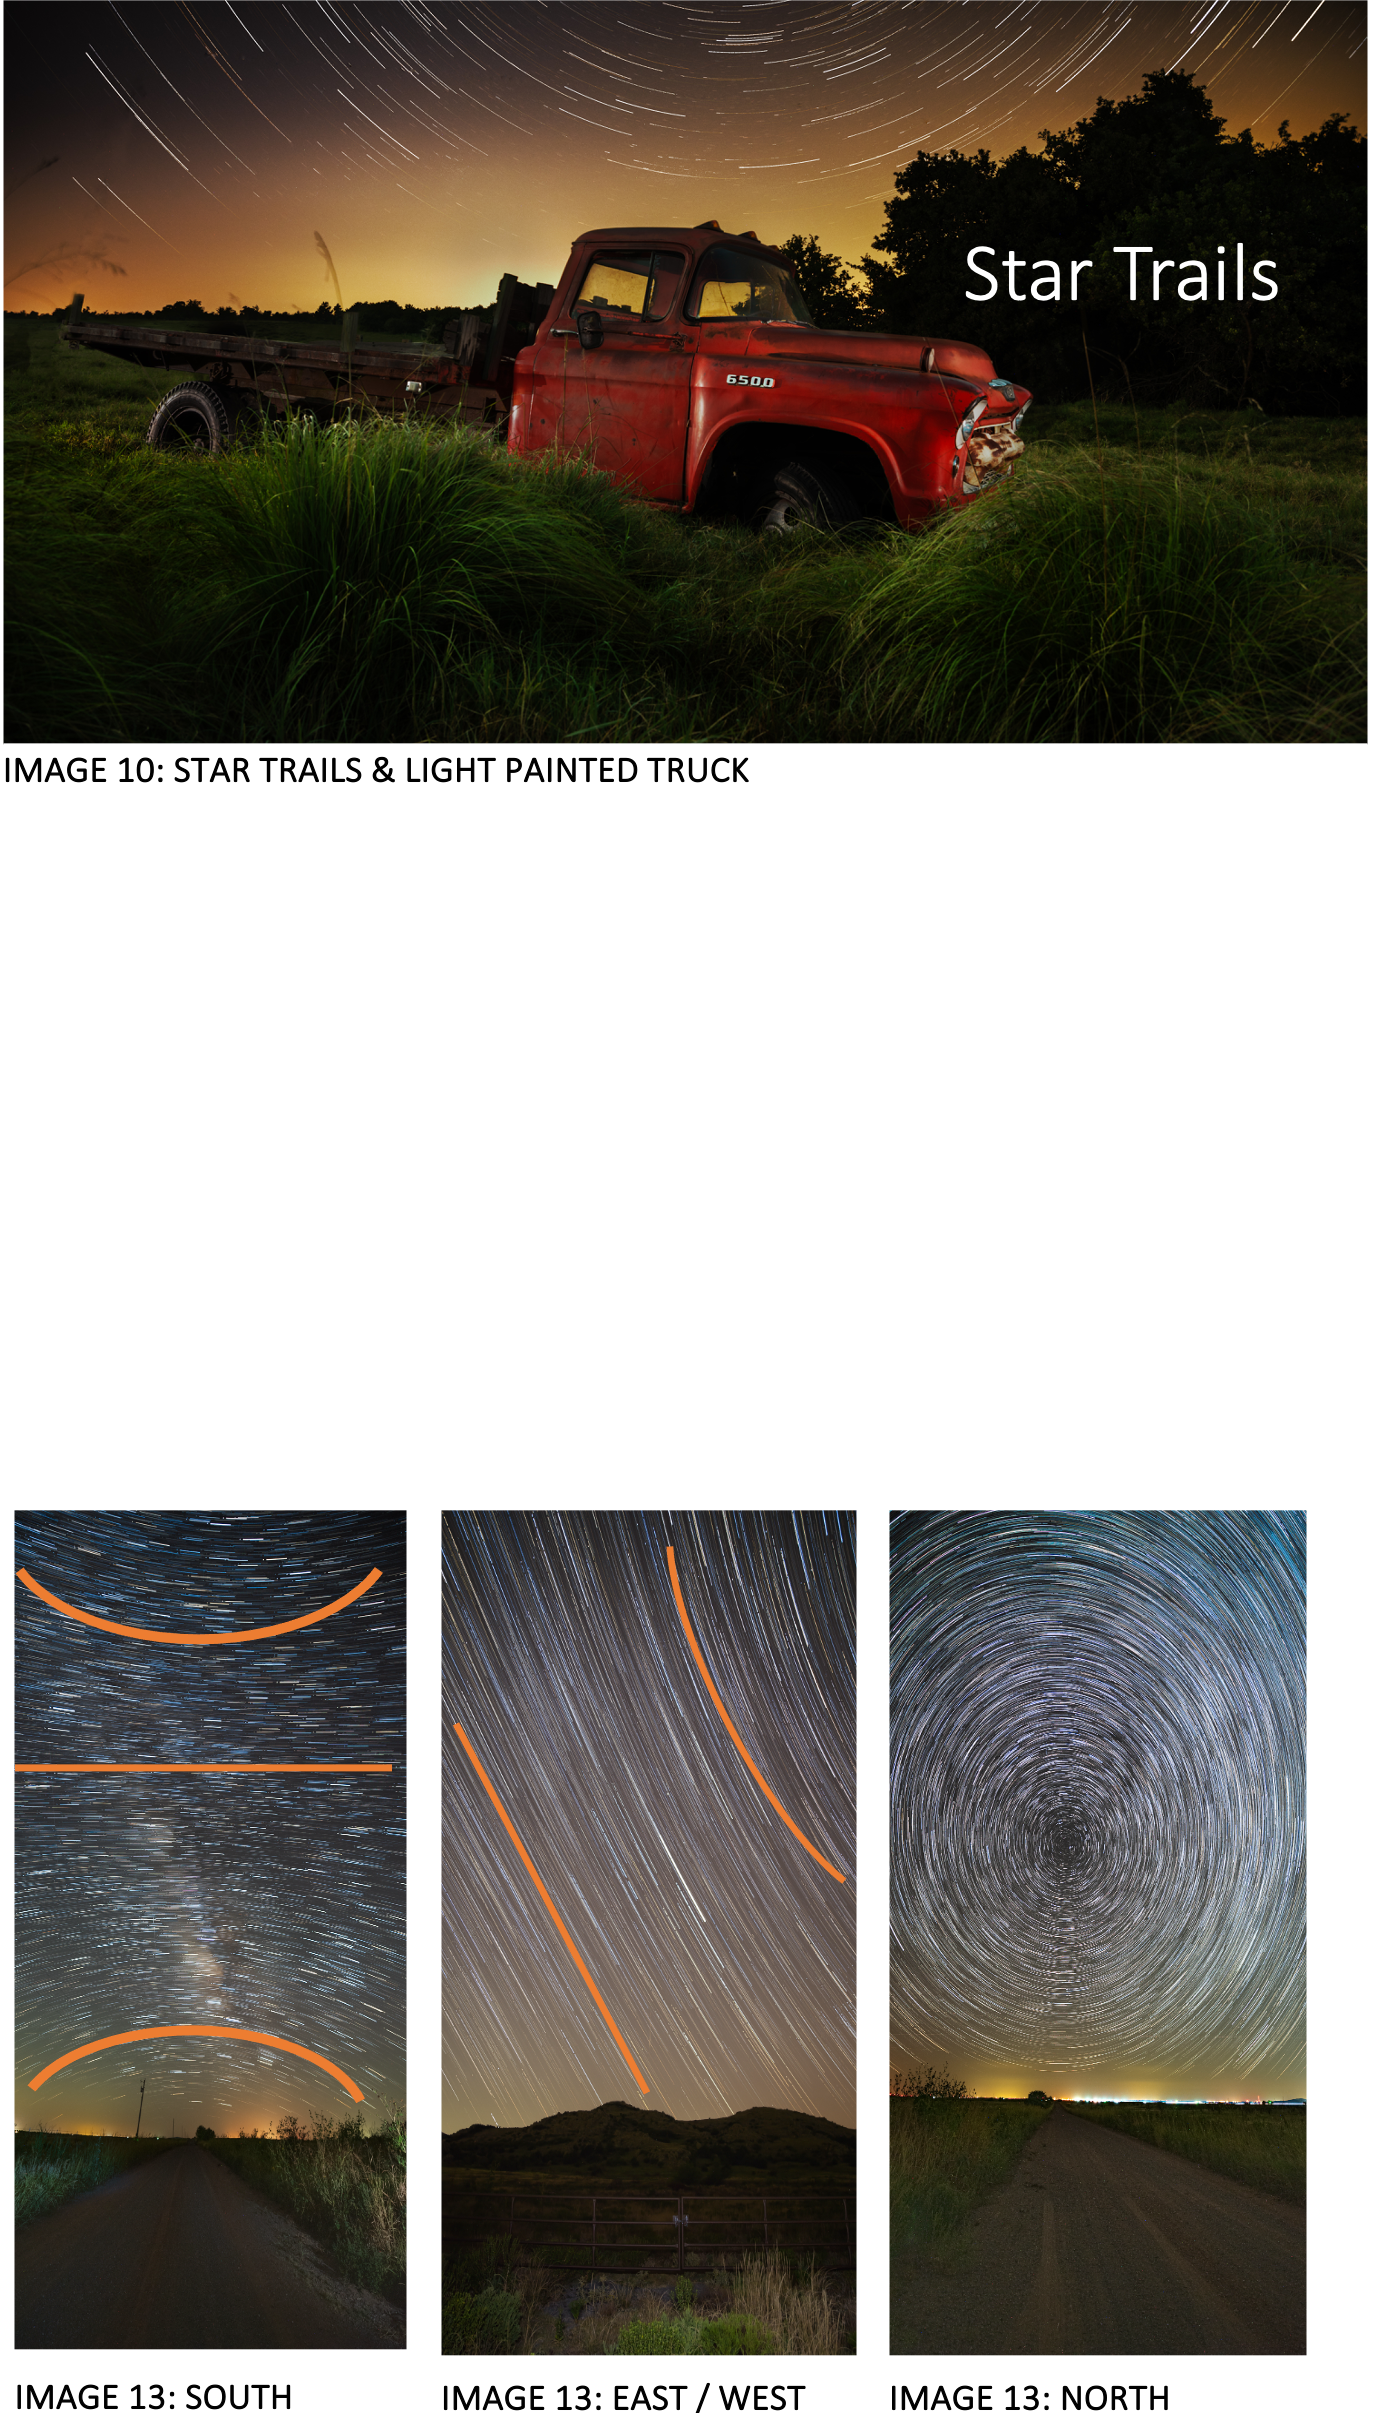
Direction Matters
The direction you point your camera changes the night sky dramatically. Here in the Northern Hemisphere looking south you will see concentric arches bowing up from the horizon. As the arches move up from the horizon they begin to flatten out as they approach the celestial equator where the star trails will become straight lines. Above the celestial equator, the star trails begin to bow in the opposite direction as they approach Polaris (North Star). Facing both East and West will produce star trails that streak down at an angle to the horizon like a downpour of rain. Finally, the movement in the northern sky is in concentric circles radiating out from Polaris.
The apparent movement of the stars is slowest near each celestial pole and fastest at the celestial equator. Meaning the star trails (and gaps) will appear longer at the celestial equator than they will near Polaris when using the same exposure time.
Techniques
Capturing star trail images can be accomplished using two different approaches to accomplish the same goal. However, I find one method is more beneficial and has higher chance for success.
Single exposure
The first involves setting up and capturing a single long exposure. This approach was used to capture star trails using film. Modern digital cameras though present an issue known as long exposure noise and hot pixels.
During an extremely long exposure, the camera's sensor remains on, collecting light. Over time some of the pixels begin to heat up. This results in additional noise and brightly colored specks on the image that will have to be cleaned up during post-processing. It's not a deal breaker but worth noting.
A risk of taking a single exposure is unintended light. During your single exposure, you are counting on the conditions to stay the same throughout the entire exposure. This can be problematic, if, like me, you shoot images anywhere near a road or other artificial light source. Imagine being two hours into your three-hour exposure and a car driving through your scene. The unexpected light probably isn’t going to add to your image.
Another scenario where taking a single long exposure can end poorly is when your camera’s battery dies during the exposure, cutting it off too soon. This leaves you with a poorly underexposed image. I feel the next approach helps mitigate the risks from these scenarios. Not that these aforementioned things don’t happen; just that if/when they do, it doesn’t ruin your night and your image. Multiple ExposuresTaking multiple exposures and blending them in post-processing provides some flexibility for those unexpected lights or dying batteries and provides noise reduction in the process. Many remote shutter releases and some modern cameras have interval shooting capabilities. It is easy to set up a timed interval and a total number of shots for your camera to take. Then if a car drives through or your battery dies you only lose a couple of frames (seconds) instead of the entire image.
Editing multiple files is easy using most photo editing software. Light Room allows you to edit a single image and then copy those edits to all the rest. This may take your computer several minutes to process. Once it has been completed, open the edited images in photo editing software that allows you to work in layers such as Photoshop, or specialized editing software like Star Stacker or Sequator.
A bonus to using multiple exposures for star trail images. All those edited photos can be turned into a time-lapse video with just a few steps! Timelapse videos can be a great way to showcase the movement of the stars. First, export the edited images as a sequence. This adds sequential numbers behind the file name. Now open Photoshop and select the open under the file menu. Select the first image in the sequence only. Near the bottom of the dialogue box check mark the open as sequence and hit ok. That is the key to turning your still images into a timelapse. Photoshop will load the images as frames of a video. To edit the video or add audio you will need to open the Timeline located inside the Windows menu at the top of the screen.
I hope this blog has helped take some of the stress and intimidation out of planning an Astrophotography shoot. In future editions, I will cover other topics including lighting and scouting tips for astro-landscape shoots. If you have recommendations for future topics, please drop me a note via the contact page.
Don't forget to follow me on social media to get notified of new content.
Thank you!!